Chapter 2: Cutting
WOOD. We require a wood of an even texture —that is, of a consistency by virtue of which the grain will present no more resistance to the knife than the interstices —yet hard enough to withstand a certain amount of wear, and to permit of crisp edges to the finest lines. Cherrywood is one of the few that possesses all these qualities, and although there are many varieties, each is reasonably good. The Japanese cutter used mountain cherry, heavier than the wild cherry that grows in England, which Mr. Seaby has used and of which he has written. Canadian cherry is between the two in appearance but it is more brittle, and it is cut in a way which suits the lumber trade rather than the engraver. However, selected planks are sometimes perfect.
Kauri is a wood from New Zealand whose suitability for this purpose was discovered and exploited by Mr. Giles. It is remarkable for apparent absence of grain.
Walnut, maple, chestnut, pear, and oak have all been used, but American oak and walnut are unsuitable. Though the ideal method is to use blocks sawn from one plank for one print, a soft wood is often substituted for the color blocks, for reasons of speed and economy. Lime, whitewood and gumwood (Circassian walnut) are good for this purpose.
All woods must be well seasoned. They must also be handled and stored with judgment. Do not, for example, leave wood exposed to direct sunlight or to heat or damp unless you wish it to warp. If warping does occur it may be corrected by damping the concave and drying the convex sides.
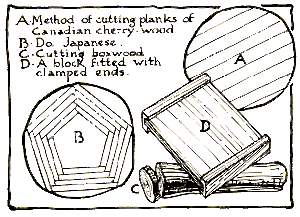
Diagram showing block with clamped ends, the Japanese and American manner of cutting planks, and the cutting of boxwood.
I have a set of blocks of which the key is English and the colors Canadian cherrywood. The former is no more than half an inch thick and somewhat green, and is just as competent an instrument as the barometer for recording variations in atmospheric humidity. Its length varies from eight and a quarter inches to eight and a half according to the weather, towards which the other blocks maintain a rigid indifference. Consequently, unless I choose my day, printing must be preceded by some very careful adjustments.
Warping, shrinking and expansion will play tricks with any system of registration, therefore buy wood by the plank, an inch thick, so that you may be sure of having seasoned wood to use.
PREPARATION of WOOD. Wood must be planed first and then scraped. For the latter purpose try discarded safety razor blades. One scraping is not sufficient. Dampen the wood and loose fibre ends will appear: these must be shaved away. Prepare both sides.
Risk of warping is diminished by clamping the ends, as in the diagram.
If possible the wood surface should admit of at least an inch margin around the design, for a purpose which will be explained hereafter.
TRANSFER OF TRACING TO WOOD. Make some starch, rice, or flour paste, and brush it over the block evenly more than once. Do not hurry over it. Recover your tracing, which will be damp enough by now, and lay it face up on your drawing board. Take up the block in your hands and lay it, pasted surface down, upon the tracing. Smooth out the creases if there are any, but carefully, because some papers will stretch very easily.
Now you have the tracing reversed, on the wood, and when dry it is ready to cut.
WOOD SUBSTITUTES. Linoleum is used as a substitute for wood, but the word is often anathema to the serious engraver, who regards it justly as lacking in
character and vitality.
Various cutting tools
Mr. Giles has perfected a method of surface printing from metal plates, which is capable of great refinement and beauty.
CUTTING TOOLS. The difference between a wood-cut and a wood-engraving lies in the fact that the former is fashioned with a knife, the other with a graver. The knife deals efficiently with wood cut plank-wise, the graver with wood cut across the grain —end-grain it is called. My knife has a flexible blade. I hold it as I hold a pencil or a pen, and it is almost as serviceable a drawing instrument. Its best and most frequent stroke is towards me. But any pointed blade will do if it is sharp enough.
You need an oil-stone and a strop. The latter is a thick piece of leather mounted upon a slab of wood, and dressed with crocus powder. A few rubs of the blade on this every few minutes will keep the edge keen, and the oil-stone will be needed rarely.
You may now commence to cut your block. Rest it upon the table in front of you, with a folded piece of cloth beneath it if it has no clamps. If the design is not perfectly clear rub oil over it.
Select a line. The wood on both sides of it must be cut away. The original wood surface is the printing surface, and that part of it not actually occupied by your design must be lowered. Your isolated line must stand up alone. For two good reasons the knife cuts must be at an angle. First, with a broad base a fine line has a good chance of survival, and second, another cut must be made to clear the line —the two completing a V-cut, which is clean and expeditious.
![]()
The direction of the stroke is necessarily varied, since it is impossible to continuously, in cutting, turn a large plank to accommodate a particular stroke.
When all lines have been cleared in this way, there are still surfaces left which must not print. Remove them with gouges and a small chisel.
Wood-carver's tools are quite suitable, though the smaller sizes are better fitted with round ends such as the wood-engraver uses —they then have the advantage of being manageable with one hand. Their full length should be from four and a half to six inches, to suit the size of your hand. They should be held in this way:
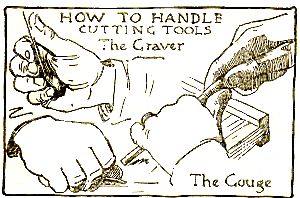
Get a carpenter to show you how to hold the wood-carving tools; a diagram will not help you much, though I have provided one. There must be something against which the plank may be pushed, or you cannot use a gouge conveniently. A screw will do, projecting about half an inch above the table top, but a strip of wood nailed to it is more useful. A careful and experienced craftsman never cuts himself because he keeps his tools sharp and never takes chances. Keep your left hand out of the way of a possible slip and remember that a blunt tool is more dangerous than a sharp one.
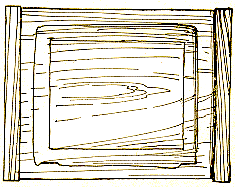
Clear the wood away from the furthest limits of the design—about one inch beyond them, but at one corner, most conveniently the bottom right-hand corner—cut a right angle with half-inch arms and clear the wood from within them. On the left bottom edge of the block cut a half-inch line (don't bother to measure it) level with the lower arm of the right angle. These cuts must be vertical, and may be made with a chisel and mallet; they are to hold the trimmed edges of the printing paper later on and serve as register marks. The diagram makes this matter clear.
Thus the outer edges of the design are cleared, ensuring a finished print with a perfectly clean margin.
HOW DEEP TO CUT. Regarding the depth to which waste areas need be lowered: do not exceed one sixteenth of an inch at the edges, but as you get away from them go deeper. The middle of a reduced section should be the deepest, because damp printing paper will sag where it has no support. However, the very first impression taken from your block will show you how far you are right.
ISLANDS. There is no need to excavate the whole of a very large waste area. The middle of it may be left standing, but the edges of this "island" must be rounded with a chisel, and afterwards sandpapered to prevent blind impressions on the printing paper.
BROKEN LINES, or parts otherwise spoiled, may be mended by inlaying a fresh piece of wood. It is a thank. less task, and one cannot help but admire the Japanese craftsman who would inlay a piece of boxwood deliberately where very fine cutting was necessary. The method is to shape your "peg," then dig a hole to fit it, or vice versa. Glue will help.
When the cutting and the clearing are finished wash off the remains of the rice paper and prepare to print.
IMPRESSIONS FROM THE KEY BLOCK. At this stage cut a cardboard mask of the size of the print including margins. Place it on sized printing paper (the process of sizing is explained subsequently) and cut around it to secure printing sheets of the correct size. Cut sheets of newspaper an inch or more larger all round than the printing sheets, and brush water evenly over them. Place alternate sheets of newsprint and printing paper on a board and cover with another. After half an hour remove newsprint except the sheets at the top and bottom of the pile. In perhaps an hour the printing sheets will be damped consistently and ready for printing. Use a black pigment for printing. Lamp-black ground in water, or in gum water, will do. Brush it over the block, and add a little paste —very little. There must be no superfluous paint or paste between lines or anywhere else. The pigment on the block should be damp but not wet. Apply a sheet of printing paper —the right-hand bottom corner fitting the right angle, and the bottom edge the cut line in the left-hand corner. Rub lightly with the printing pad over a protecting sheet of butter paper.
While the sheet is still damp —providing no corrections are needed —paste face down upon another block.
Paper expands in varying degrees when damped, and for this reason the last caution needs emphasis. Never paste down a dry key impression: if you do, the shock will come when all the engraving and printing is done. The offending color may be a quarter of an inch short of requirements, and a hiatus of that dimension in an otherwise perfect correlation is quite annoying. It is well therefore to have a new block freshly covered with paste ready to take the impression immediately it is pulled. Or if a number of impressions are dealt with keep them between damp sheets.
It is sometimes necessary to allow the impression to dry in order to draw color shapes upon it which have not been outlined on the key block. In this case be sure when pasting down that the paper is of the same degree of humidity as when it was printed.
Care must be taken to cut away sufficient wood between the edge of the design and the edge of the block to ensure that the margin of the print shall be safe from paint smudges.
PLANNING THE COLOR BLOCKS. When the key is in pure outline the planning of the color blocks is a straight-forward matter exemplified by almost any Japanese print. Local color broken only by pattern and modified perhaps by gradations, fills in the spaces outlined. Broadly speaking one block is cut for one color. Even the addition of light and shade does not complicate matters unduly. But the subtle tonal and chromatic changes for which we now look in landscape may be represented only by the cutting of more blocks and by overprinting.
The tendency is to simplify, to cut down the number of blocks. Instead of using a blue and a yellow and a green you try to eliminate the green block and get that color by printing blue over yellow. Tone is a factor which prevents the extended use of overprinting, however. The blue of the sky is not intense enough to give a vivid green, say, for the foreground. But the carnations of the flesh are invariably and best done in this way. Gray in landscape is a valuable undertone. In Wylye Mill Bridge the ground color is gray with only the high lights (in the sky) picked out. Though by overprinting a better surface finish is sometimes acquired, avoid too much of it. It is bad technique —though it happens —to have a number of colors printing one over the other. The paper becomes sodden, which causes delay.
Make sure the grain of the wood is consistent in quality and direction with the texture of whatever the color surface represents. In selecting wood for a line block let the grain run in the general direction of the lines, if possible, since a line cut along the grain is less likely to chip than one cut across. [Example of a Phillips color wood-cut taking advantage of the grain of the wood]
Rather than use a cheap, thin, and more or less transparent paper for working proofs, use ordinary printing paper, or a fairly heavy paper anyway. If it is too thick and opaque after pasting down it may be stripped very easily. When dry separate the superfluous stratum with a knife at one corner and rip it off boldly. Subsequent oiling is necessary. The reason for my preference for heavy paper is that it permits of greater accuracy in printing. A thin paper will sag over every depression) and so cause mistakes in dimension.
Considering one color only, cut around all the masses that contain it and remove the intervening shapes. Only the surface covered by that one color must remain intact.
Cut along the middle of a fine line which defines a color mass. Do not neglect to cut carefully around the corner of the paper which in the process of printing fitted the right angle (the register mark) which you cut on the key block, and along the edge which fitted the line. Make exactly similar cuts to those on the key block. Done properly this is a perfect system of register; on the other hand it is often the cause of much tribulation to the careless worker.
Two colors far enough apart may be cut on one block.
A simple arrangement of a few colors is generally effective where the surfaces are simple and as far as possible unbroken. Study the possible effects of wood grains, and avoid such mistakes as a vertical grain in a sky, or a diagonal grain in a sheet of water. On occasion it is desirable to select a piece of wood whose grain will not print readily; and conversely a wood like fir which prints a most definite grain pattern, has its uses.
When all the color blocks are cut you are ready to print.